- Hey, Guest
- Show unread posts since last visit.
- Show new replies to your posts.
- Show new items for Sale since last visit
News:
Putting FUN and FRIENDLINESS, FIRST into owning and learning about AMC small bodied cars, primarily Eagles, Spirits and Concords as well as vehicles built in AMC's Mexican subsidiary, VAM.
The AMC Eaglepedia can now be accessed using the buttons found below This is a comprehensive ever growing archive of information, tips, diagrams, manuals, etc. for the AMC Eagle and other small bodied AMC cars.
Also a button is now available for our Face Book Group page.
Welcome to the AMC Eagles Nest. A new site under "old" management -- so welcome to your new home for everything related to AMC Eagles, Spirits and Concords along with opportunities to interact with other AMC'ers. This site will soon be evolving to look different than it has and we will be incorporating new features we hope you will find useful, entertaining and expand your AMC horizons.
You can now promote your topics at your favorite social media site by clicking on the appropriate icon (top upper right of the page) while viewing the topic you wish to promote.
Recent posts
4X4 and Driveline / Re: Transfer case actuator
Last post by mudkicker715 - November 22, 2025, 06:02:50 PMQuote from: LukeMacPU on November 22, 2025, 11:29:14 AMhttps://www.ebay.com/itm/403981259935Try posting under resource and interchange center, than maybe how to's. We love how to's as we get older. Thanks
Recently had good success modifying an early 90's wrangler axle actuator to serve as replacement for same listed above for my son's '86 4 dr wagon.
Same diameter actuator shaft, but longer and no slot/hole. Used a cut-off wheel to shorten and slot then drilled a hole to match stock actuator end.
Jeep part has a hex head at actuator base, must be rounded to fit Eagle bracket on transfer case. If you have basic power tool skills you can make this work easily for less than $30.
Not sure where best to post this info, thought it might help someone. I just took a chance based on photos from internet before buying the more expensive custom part. Was an easy win.
4X4 and Driveline / Re: Transfer case actuator
Last post by LukeMacPU - November 22, 2025, 11:29:14 AMRecently had good success modifying an early 90's wrangler axle actuator to serve as replacement for same listed above for my son's '86 4 dr wagon.
Same diameter actuator shaft, but longer and no slot/hole. Used a cut-off wheel to shorten and slot then drilled a hole to match stock actuator end.
Jeep part has a hex head at actuator base, must be rounded to fit Eagle bracket on transfer case. If you have basic power tool skills you can make this work easily for less than $30.
Not sure where best to post this info, thought it might help someone. I just took a chance based on photos from internet before buying the more expensive custom part. Was an easy win.
Under the Hood & HVAC / Re: Vacuum lines and desmoggin...
Last post by HarpySolitarius - November 22, 2025, 01:20:42 AMQuote from: amcfool1 on November 19, 2025, 12:55:03 PMhi and welcome. I have a (mostly) restified 84 Sedan. As for the pulse air system, its mostly stand alone, so should not affect the engine vac system. I recommend you replace the cat. converter with a modern freeflow type, which I did. Reason being, that the original cat NEEDS that pulse air. without it, it can overheat to the point the carpet above it can catch fire, also, its old, and probably half clogged up anyway. Good luck, gz
amcfool1 what does your area's emission standards look like? If you're required to pass emissions do they do a visual inspection of factory installed emissions equipment, and what concentration of hydrocarbons and carbon dioxide do they allow for '84 of vehicles?
EDIT: Found out that I wouldn't be able to pass emissions in my county if I went through with that suggestion as I'm ""not allowed to"" remove factory installed emissions equipment outside of performing repairs. The inspection shop according to code is supposed to inspect for functionality of all emissions systems that are listed on the emissions card for the vehicle. Since mine lists the pulse air system it needs to be there, even if it were to be under the hydrocarbon and carbon dioxide limit. That being said idk how much this is actually enforced, but Its still safer to repair though since inspections in my county do leave a photographic trail behind which could end up burning me later if another shop does enforce this policy...
Under the Hood & HVAC / Re: Vacuum lines and desmoggin...
Last post by HarpySolitarius - November 22, 2025, 12:49:26 AMQuoteThis is normal. This is the fresh air line for the charcoal canister. The port under the canister pops off and there is a replacable filter hiding underneath to keep dirt out of the system.
Noted, I should probably add replacing that filter to my task list then.
QuoteFor the '82 the PCV port on the canister runs into a T-fitting on top of the PCV and then runs to the PCV inlet port at the base of the carb. Supposedly there was also a solenoid inline somewhere to block the PCV at times but IIRC this was removed as per a service bulletin later on.
I was able to find the PCV solenoid laying around in the engine, I don't think it ever got taken in for the recall/service bulletin. I read a post earlier stating that the recall was for the solenoid to be removed and replaced with a vacuum line that limits the airflow through an orifice or size reduction.
QuoteThat almost looks like they found a random electrical bullet connector and stuffed it in the port. People are stupid. Remove it. If that's the sol-vac connector, it being stuffed onto the port on the EGR is shorting the control circuit out.
after inspecting it further, you are correct. They were in fact the sol-vac wires (diode pack and mcu connection) so I will need to verify that circuit...
QuoteYour pictures seem to indicate most of The plumbing for the CTO is still there, including hard plastic 90 degree elbows. We can also see that your vehicle probably had Pulse Air instead of the smog pump.
Yes the plumbing for the CTO is there, however they are very much not hooked up to where they are supposed to be. The two ports that are not plugged with screws connect to the pulse air solenoids on top of the valve cover. This seems to have created a loop of vacuum lines that don't connect anywhere as the vacuum canister in the driver fender wheel well area does not connect to anything else as of right now.
Yes, the vehicle had the pulse air system instead of smog pump. Emphasis being on had. The upstream pipe rusted out and fell off at some point leaving only about 1' of length left. Then the downstream pipe is completely gone.
QuoteCorrect. Easy to undo.Yeah, took a lot of cleaning to get the actuator to move though. Do you happen to have any tips for removing thick oil build up?
QuoteThe sol-vac is an easy delete because it's two screws but replacements are still available NOS. I absolutely advise you replace it.
I have one on the way it doesn't look to bad to install, but I will have to redo the connector on it because those wires got kinda messed up to plug the egr I think.
QuoteMy accumulated opinion here is that when smog controls started to roll out starting in the 70's most professional (dealership) mechanics got the proper training to continue doing their job correctly but the smaller less experienced shops who are far more numerous and ran much lower margins never really learned how to troubleshoot or maintain it... so they just started pulling parts and plugging lines.
Thanks for this explanation!!! I was worried that there might have been underlying issues that would have lead to someone bypassing these systems but this shows I was waaaay over thinking it HaHa.
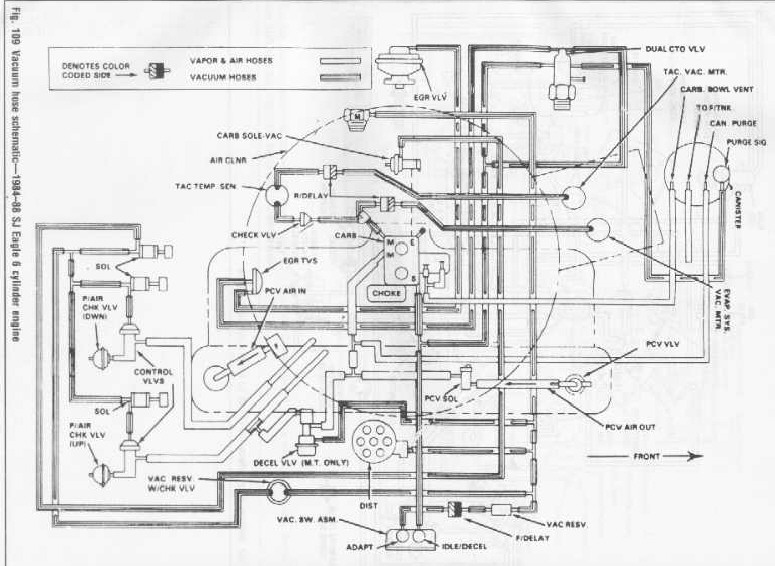
QuoteLooking in my documentation, I do not have routing diagrams for 1984 model Eagles. In either 1983 or 1984 there was a major revision with the routing so I can't assure you the diagrams I have will be correct. Looking at the diagrams in Eaglepedia, I would hazard this diagram is the closest to yours (excluding the Deceleration Valve, which is California only)
Took some time but I was able to clean off enough soot and oil off of the emissions diagram in the engine bay to read it, that sticker is surprisingly durable. It appears that you were right on the money with your guess! It is the standard 84-88 diagram shown in the mr251 minus the decel valve
QuoteBecause the air tubes and control valves are NLA and extremely expensive to source NOS, as long as you can legally do so, you CAN omit the Pulse Air system and run a normal catalytic converter. The computer will not complain because it's completely downstream of all sensors in the feedback system.
I do have to pass emissions with this car as I am located in Salt Lake County Utah. For vehicles of its age I know they will need to pass the 2 speed idle test. I am not as sure on this but I do believe they will check for tampering with emissions components, so I miiiiight have to reinstall it??? Although I am wondering, would a non pulse air cat be more effective than one with pulse air? I am fine doing the welding and fab work to reinstall these components if need be.
QuoteIn my opinion, If you are determined to restore the vacuum system my suggestion is to note the location of all of the vacuum delay pods and check valves (direct AND colors matter!) and then remove everything, inspect, clean, test, run an inventory of your remaining fittings and parts and then proceed to re-plumb the system. Expect to verify if they have altered the distributor vacuum advance curve. The graph to follow is also in the TSM/Eaglepedia.
This is sort of how I have been going about it. I have been using painters tape to label each connection and where its going to. Generally as I have been removing parts I have been cleaning, testing and painting them.
QuoteOne catch is the missing TAC valve for the EGR. It's a Ford part and its purpose is to simply disable the EGR when the ambient air is cold enough to not require EGR at all. I do strongly recommend you source a replacement.
I have ordered this part and its retaining clip, but its 2 weeks out (RIP).
QuoteAs for the computer, verify they have not butchered anything else in the loom and the undo the bypass. The wiring diagram for the feedback system as well as testing for all of the components can be found here:
I removed all of the wire looming to inspect the wires and it seems this madness extends to the wiring. I can confidently say that they didn't do a ECM Test bypass, however that is about the only thing they didn't do it seems. There are several areas where wires got spliced and crimped together then covered with silver duck tape instead of electrical tape. I will probably need to make another post on the electrical once I get my bearings on what happened and what options might be best going forward. This will probably continue my session of yak shaving by redoing all of the wiring in the engine bay lmao
QuoteI would suspect that the O2 sensor is stone dead. The troubleshooting documentation does not tell you how to directly test it but with a DMM between chassis ground and the single wire coming out of the sensor, you should see close to 0v for a lean mixture and 1V for a rich mixture. Until the computer is fully working again and the idle screws are dialed back though, you won't see the sensor doing much.
Thanks!!! Completely slipped my mind to check if its still good. I'd imagine o2 sensors for this car probably aren't too expensive so it'll probably be worth it to replace it regardless.
During this whole process I found not much was connected to the vacuum canisters and am wondering what systems are supposed to connect to each vacuum canister (the canisters on my eagle are the bean cans on passenger firewall and driver wheel well). I believe cruise control, ac, and select drive are each supposed to connect to a vacuum canister, however of these systems only cruise control was actually connected to a canister, this being the bean can on the passenger firewall. Skimming through mr251 I haven't seen much notice given to where the vacuum canisters are located and from reading forums depending on the year and systems you could have anywhere from 1-3 different canisters and there doesn't seem to be much consistency with how they are connected to the additional systems. Does it not matter which systems connect to which reservoir since they're both gonna be supplied from manifold and are both functionally the same part?
Project Cars / Re: 1980 Eagle Sport STW 258+T...
Last post by juhap - November 21, 2025, 12:00:39 AM
Under the Hood & HVAC / Re: Vacuum lines and desmoggin...
Last post by MIPS - November 20, 2025, 11:56:16 PMQuoteThe bottom port/vacuum line of the vapor canister doesn't run anywhere and I haven't been able to figure out where it would have run originally (the loose end is zip tied to the bottom of the radiator).This is normal. This is the fresh air line for the charcoal canister. The port under the canister pops off and there is a replacable filter hiding underneath to keep dirt out of the system.
QuoteThe PCV valve itself runs direct to the vapor vent tube on the carb bypassing the vapor canister. The angled T-split for the ported purge line loops back in on its self. The only thing normal about the lines is that the PCV inlet still runs from the filtered air cleaner port.For the '82 the PCV port on the canister runs into a T-fitting on top of the PCV and then runs to the PCV inlet port at the base of the carb. Supposedly there was also a solenoid inline somewhere to block the PCV at times but IIRC this was removed as per a service bulletin later on.
QuoteEGR system: The EGR valve is plugged??? it spits to two white tubes but is completely plugged by silicone. The EGR CTO also has 2 screws plugging lines. Naturally this means the distributor no longer shares a line with the EGR.
That almost looks like they found a random electrical bullet connector and stuffed it in the port. People are stupid. Remove it. If that's the sol-vac connector, it being stuffed onto the port on the EGR is shorting the control circuit out.
Your pictures seem to indicate most of The plumbing for the CTO is still there, including hard plastic 90 degree elbows. We can also see that your vehicle probably had Pulse Air instead of the smog pump.
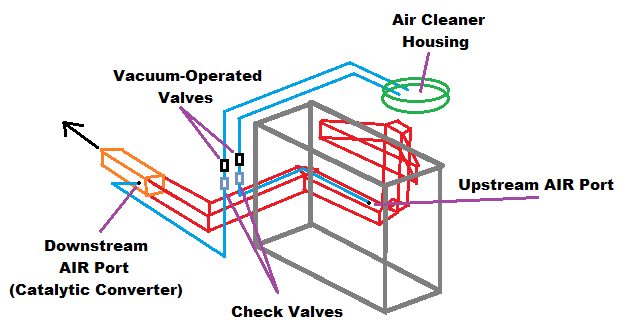
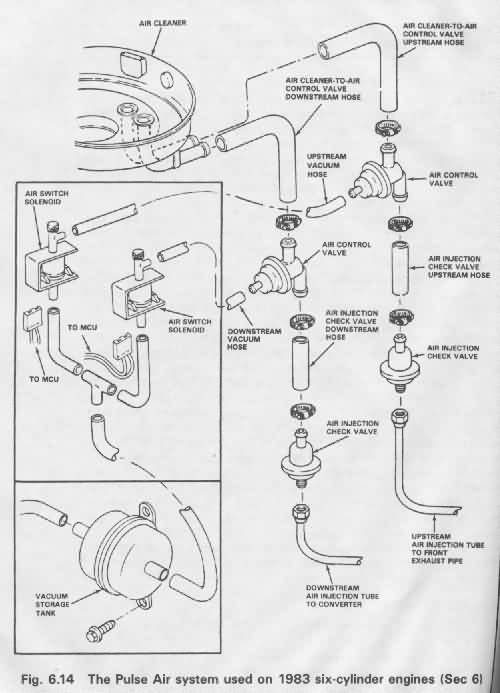
The system should be somewhat similar to this, as you've already researched:
QuoteTAC system: They put a screw by the air cleaner door actuator mechanism so its always open???Correct. Easy to undo.
The sol-vac is an easy delete because it's two screws but replacements are still available NOS. I absolutely advise you replace it.
QuoteThis leaves me wondering, if there might have been a reason for the previous owner to modify these vacuum lines in this way. It almost seems as if the previous owner tried to de-smog the vehicle?My accumulated opinion here is that when smog controls started to roll out starting in the 70's most professional (dealership) mechanics got the proper training to continue doing their job correctly but the smaller less experienced shops who are far more numerous and ran much lower margins never really learned how to troubleshoot or maintain it and the costs for some of the parts was so high it risked turning potential return customers (people who could not afford to get their vehicle serviced at the dealership) away so it was written off early on as "those darn governments are making my job harder!" and it became instinctive to just delete or disable the systems, so long as the law allowed it. This bad knowledge (seriously, that the heck kind of a clown called it "Nutte r "?) trickled down from one generation to the next and thus the next groups of backyard mechanics who learned from their local shops and fathers/uncles/grandfather and later Youtube and Internet Forums also got poisoned into believing the same thing and when you add Jeep People into the equation you end up with a lot of poorly maintained engines leaking every possible fluid in front of a cement-head who complains about paying $15 a year for an air filter but insist that their clogged EGR is because it's an EGR, not because the engine burns a quart of oil a week.
What you are looking at is someone who had no idea what anything was doing, so they just started pulling parts and plugging lines.
Looking in my documentation, I do not have routing diagrams for 1984 model Eagles. In either 1983 or 1984 there was a major revision with the routing so I can't assure you the diagrams I have will be correct. Looking at the diagrams in Eaglepedia, I would hazard this diagram is the closest to yours (excluding the Deceleration Valve, which is California only)
Because the air tubes and control valves are NLA and extremely expensive to source NOS, as long as you can legally do so, you CAN omit the Pulse Air system and run a normal catalytic converter. The computer will not complain because it's completely downstream of all sensors in the feedback system.
In my opinion, If you are determined to restore the vacuum system my suggestion is to note the location of all of the vacuum delay pods and check valves (direct AND colors matter!) and then remove everything, inspect, clean, test, run an inventory of your remaining fittings and parts and then proceed to re-plumb the system. Expect to verify if they have altered the distributor vacuum advance curve. The graph to follow is also in the TSM/Eaglepedia.
One catch is the missing TAC valve for the EGR. It's a Ford part and its purpose is to simply disable the EGR when the ambient air is cold enough to not require EGR at all. I do strongly recommend you source a replacement.
As for the computer, verify they have not butchered anything else in the loom and the undo the bypass. The wiring diagram for the feedback system as well as testing for all of the components can be found here:
https://archive.org/details/amcet501instructionmanual
(you do NOT need the special tester to perform the manual checks)
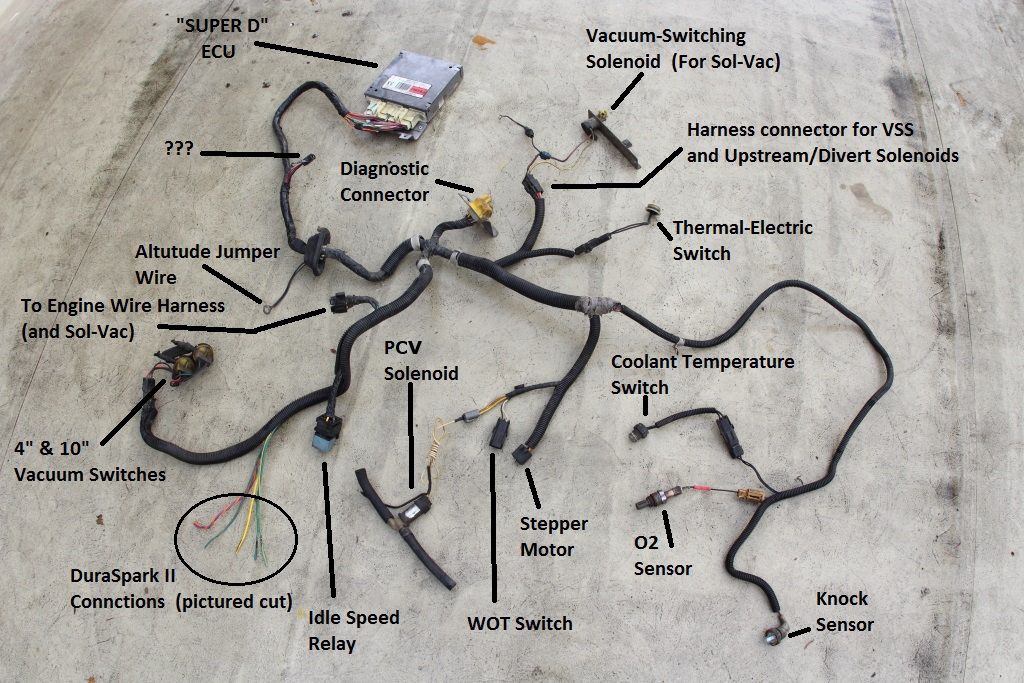
As for how big the feedback system is....
I would suspect that the O2 sensor is stone dead. The troubleshooting documentation does not tell you how to directly test it but with a DMM between chassis ground and the single wire coming out of the sensor, you should see close to 0v for a lean mixture and 1V for a rich mixture. Until the computer is fully working again and the idle screws are dialed back though, you won't see the sensor doing much.
TL;DR: You will have to baseline the vacuum system and the feedback system to make it run properly but I can assure you that once it's overhauled and dialed-in, the engine runs great on and off the road.
Project Cars / Re: 1980 Eagle Sport STW 258+T...
Last post by Jawbone1021 - November 20, 2025, 07:30:20 PMQuote from: juhap on October 28, 2025, 04:30:06 AMAlmost finished...Wow looks great! Are you going to put some pinstripes on?

Under the Hood & HVAC / Re: Vacuum lines and desmoggin...
Last post by amcfool1 - November 19, 2025, 12:55:03 PMHatchlings / Re: New member - Indiana ‘86 4...
Last post by LukeMacPU - November 17, 2025, 08:28:34 AMThe kid now needs to get his headlights re-installed (damaged / missing adjuster screws and one side mounting bracket) and side mirrors and he's in business. Still more stuff to fix, but he should be able to start driving it then.
Hatchlings / Re: New member - Indiana ‘86 4...
Last post by Taylor - November 17, 2025, 06:52:18 AMHope this helps.
Good luck with the project.