- Hey, Guest
- Show unread posts since last visit.
- Show new replies to your posts.
- Show new items for Sale since last visit
News:
Putting FUN and FRIENDLINESS, FIRST into owning and learning about AMC small bodied cars, primarily Eagles, Spirits and Concords as well as vehicles built in AMC's Mexican subsidiary, VAM.
The AMC Eaglepedia can now be accessed using the buttons found below This is a comprehensive ever growing archive of information, tips, diagrams, manuals, etc. for the AMC Eagle and other small bodied AMC cars.
Also a button is now available for our Face Book Group page.
Welcome to the AMC Eagles Nest. A new site under "old" management -- so welcome to your new home for everything related to AMC Eagles, Spirits and Concords along with opportunities to interact with other AMC'ers. This site will soon be evolving to look different than it has and we will be incorporating new features we hope you will find useful, entertaining and expand your AMC horizons.
You can now promote your topics at your favorite social media site by clicking on the appropriate icon (top upper right of the page) while viewing the topic you wish to promote.
Recent posts
Under the Hood & HVAC / Re: Vacuum lines and desmoggin...
Last post by MIPS - December 02, 2025, 12:07:36 AMResources / Re: Fairly easy vacuum actuato...
Last post by mudkicker715 - December 01, 2025, 09:58:52 PMResources / Re: Fairly easy vacuum actuato...
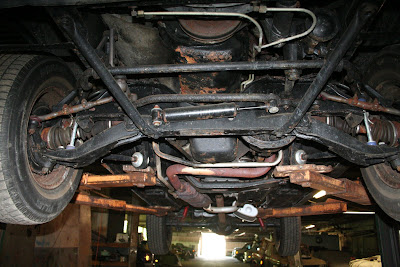
Last post by vangremlin - December 01, 2025, 11:15:32 AMSuspension, Steering, Brakes, Wheels & Tires / Re: Complete Front Susupension...
Last post by buffy - November 29, 2025, 01:17:26 PMResources / Fairly easy vacuum actuator sw...
Last post by LukeMacPU - November 28, 2025, 06:58:03 PMRecently had good success modifying an early 90's wrangler axle actuator to serve as replacement for 4wd transfer case actuator for my son's '86 4 dr Eagle wagon.
Same diameter actuator shaft, but longer and no slot/hole. Used a cut-off wheel to shorten and slot then drilled a hole to match stock actuator end.
Jeep part has a hex head at actuator base, must be rounded to fit Eagle bracket on transfer case. If you have basic power tool skills you can make this work easily for less than $30.
Not sure where best to post this info, thought it might help someone. I just took a chance based on photos from internet before buying the more expensive custom part. Was an easy win.
Under the Hood & HVAC / Re: Vacuum lines and desmoggin...
Last post by HarpySolitarius - November 25, 2025, 07:37:17 PMQuoteI ran into issues sourcing the correct packard connector so I could build the relay box to convert the smog pump signalling to pulse air. I also never figured out where the upstream port is supposed to join with the exhaust or what it looks like (and is it routed like a draft tube inside the exhaust) I did the rough-in but never committed to installing it, so I reverted it back to Canada spec.
RIP, I was hoping cause there is not a lot of information out there on this system it seems. If this is a project you want to revisit, though, I could try to get you a 3d scan of whats left of my upstream air port, then try to get some interior pictures with my cheapo borescope to see if there is any venturi effect shenanigans going on once I get time in January.
Until then, I think your replies have given me enough information to finish getting the vacuum lines in order
Under the Hood & HVAC / Re: Vacuum lines and desmoggin...
Last post by MIPS - November 24, 2025, 01:34:55 AMQuoteHowever I will still need to figure out where its supposed to meet the check valves on the passenger side of the engine bayThe check valves should join the steel tubes to the rubber hoses beside the starter.
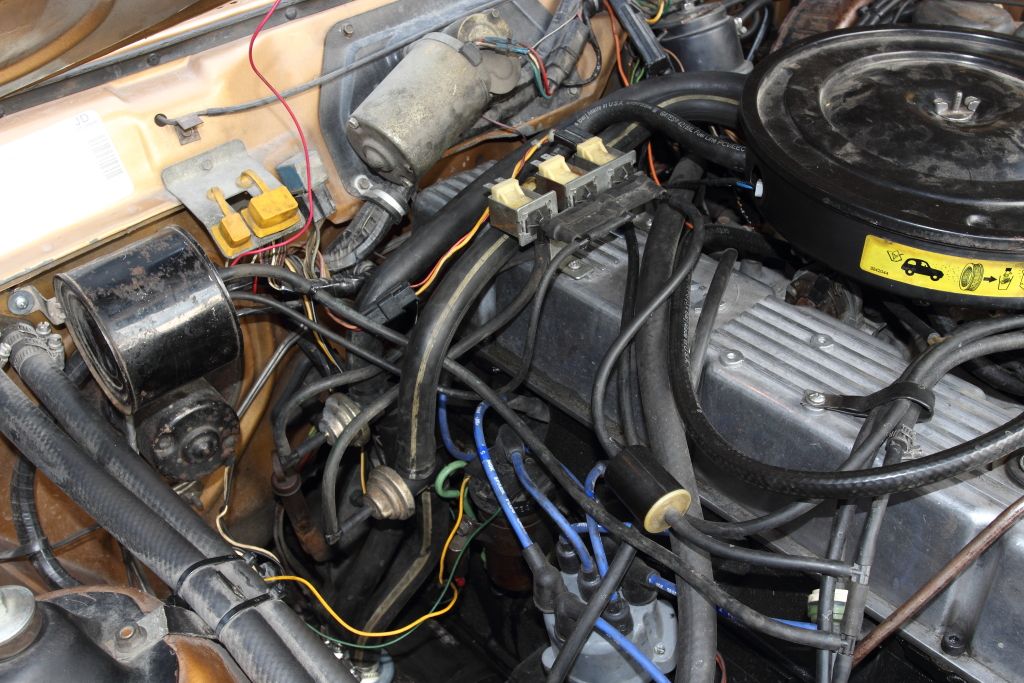
QuoteDoing some research though, I came across one of your posts from 2022 on the topic of "Pulse Air Information" where you mentioned trying to retrofit the pulse air components to your eagle that didn't come stock with it. However in this most recent post your image shows that you have the pulse air components on your air cleaner and on top of the valve cover, is this a temporary thing to act as visual aid, or did you manage to get this working?
I ran into issues sourcing the correct packard connector so I could build the relay box to convert the smog pump signalling to pulse air. I also never figured out where the upstream port is supposed to join with the exhaust or what it looks like (and is it routed like a draft tube inside the exhaust) I did the rough-in but never committed to installing it, so I reverted it back to Canada spec.
QuoteMy guess is that I should hook up cruise control to its own booster (since I basically live in the mountains), then split the other booster among the remaining systems of AC, air management, and select drive?You can still buy vacuum canisters. I was missing the one for my cruise control so I purchased a modern spherical one and added a check valve. There isn't really a spec to them so "one roughly the same size" will work.
Under the Hood & HVAC / Re: Vacuum lines and desmoggin...
Last post by HarpySolitarius - November 24, 2025, 12:39:32 AMQuoteOkay I thought that was the case. I We've had a few Colorado users here over the years and I swear they mentioned the state was pretty strict on missing parts.
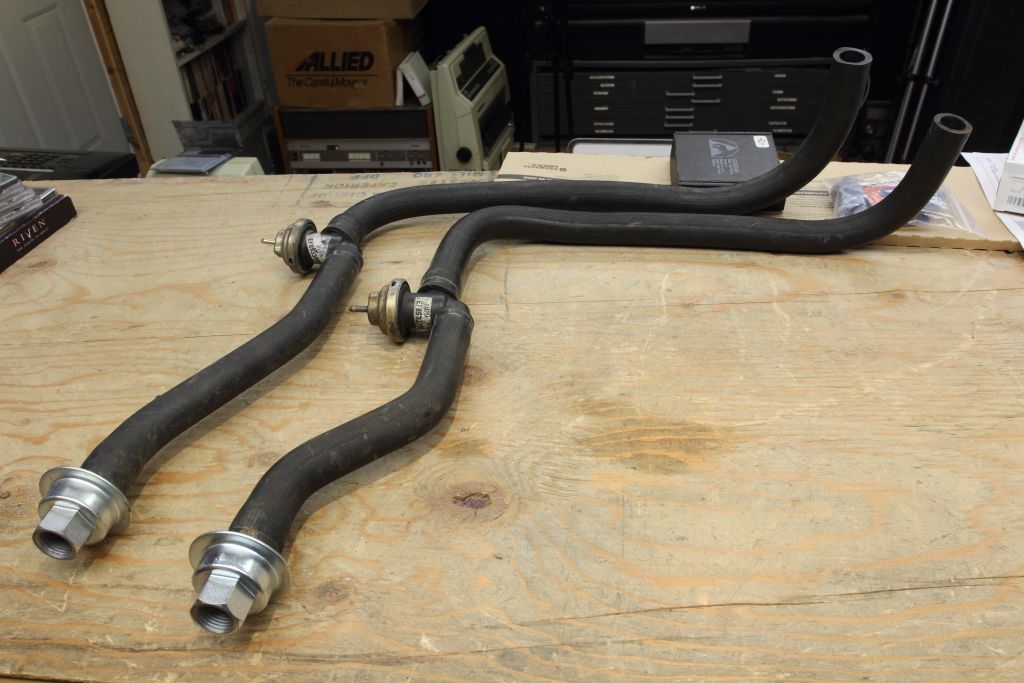
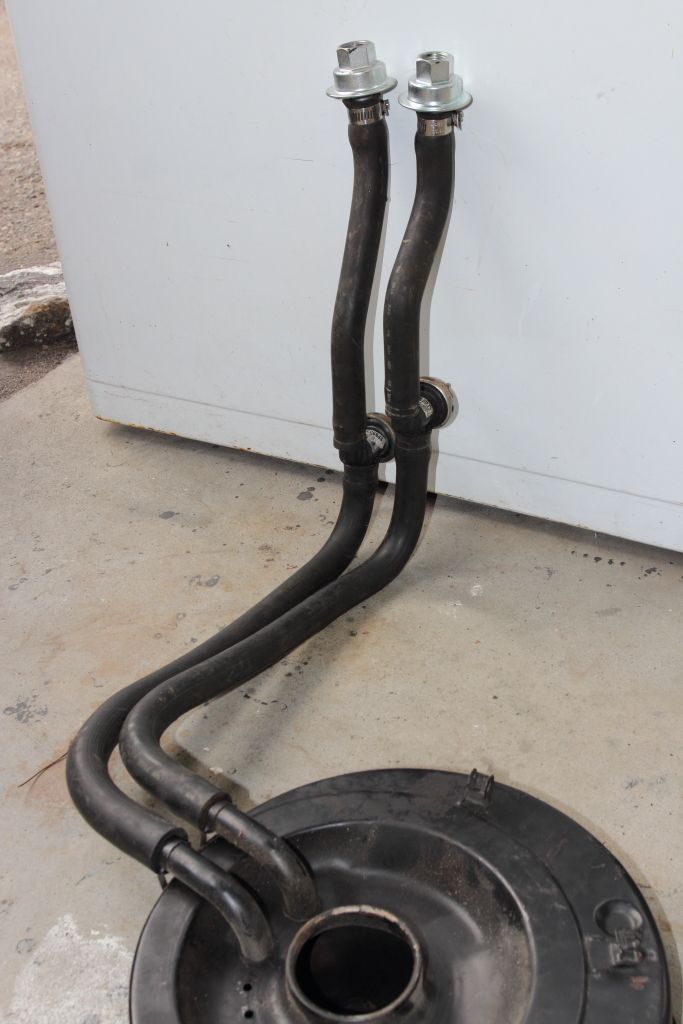
The PulseAir system is going to be a challenge. The air control valves are Ford parts and the check valves can still be purchased but the metal air tubes are the tough one because they loved to rust out. I don't believe anyone makes them anymore and I have never seen them to be able to deduct how complicated they are to take to a pipe shop and have them bend you a new one.
I have all the parts on the way for it except for the metal tubing. I found this image floating around on The Amc Forum that vaguely shows how the tubing routes, and luckily I still have the upstream port with enough length to suggest the path taken in the non visible part of the image. However I will still need to figure out where its supposed to meet the check valves on the passenger side of the engine bay
However getting this system to work will be a lot of time and effort that I will not have until after the Holidays. So I will probably cap off the solenoids for now, get the rest of the vacuum lines redone, then make January my month to work on the exhaust system and get it up to spec.
Doing some research though, I came across one of your posts from 2022 on the topic of "Pulse Air Information" where you mentioned trying to retrofit the pulse air components to your eagle that didn't come stock with it. However in this most recent post your image shows that you have the pulse air components on your air cleaner and on top of the valve cover, is this a temporary thing to act as visual aid, or did you manage to get this working?
QuoteThe vacuum canisters (called vacuum boosters or vacuum amplifiers) are there so that while the AC, cruise control or the air management valves are operating they don't take away from the manifold vacuum. The cruise control especially needs it as a booster for when you are in hilly regions that may require more throttle and thus less manifold vacuum will be available. Some of the cans have internal check valves. Sometimes it's external like on my dealer installed vacuum canister.
Because I don't have AC or air management I just have the one canister mounted above the charcoal canister with a check valve.
Okay, both of the boosters that came with the car were identical in function, having the built in check valves and having bean cans as its outer appearance. My guess is that I should hook up cruise control to its own booster (since I basically live in the mountains), then split the other booster among the remaining systems of AC, air management, and select drive?
Under the Hood & HVAC / Re: Vacuum lines and desmoggin...
Last post by MIPS - November 23, 2025, 03:39:59 AMThe PulseAir system is going to be a challenge. The air control valves are Ford parts and the check valves can still be purchased but the metal air tubes are the tough one because they loved to rust out. I don't believe anyone makes them anymore and I have never seen them to be able to deduct how complicated they are to take to a pipe shop and have them bend you a new one.
QuoteDuring this whole process I found not much was connected to the vacuum canisters and am wondering what systems are supposed to connect to each vacuum canister (the canisters on my eagle are the bean cans on passenger firewall and driver wheel well). I believe cruise control, ac, and select drive are each supposed to connect to a vacuum canister, however of these systems only cruise control was actually connected to a canister, this being the bean can on the passenger firewall. Skimming through mr251 I haven't seen much notice given to where the vacuum canisters are located and from reading forums depending on the year and systems you could have anywhere from 1-3 different canisters and there doesn't seem to be much consistency with how they are connected to the additional systems. Does it not matter which systems connect to which reservoir since they're both gonna be supplied from manifold and are both functionally the same part?The vacuum canisters (called vacuum boosters or vacuum amplifiers) are there so that while the AC, cruise control or the air management valves are operating they don't take away from the manifold vacuum. The cruise control especially needs it as a booster for when you are in hilly regions that may require more throttle and thus less manifold vacuum will be available. Some of the cans have internal check valves. Sometimes it's external like on my dealer installed vacuum canister.
Because I don't have AC or air management I just have the one canister mounted above the charcoal canister with a check valve.
Electrical / High beams, fog lights, and af...
Last post by vangremlin - November 22, 2025, 09:31:46 PMI was having headlight issues on my 1980 2 door sedan, which came equipped with factory fog lights. I installed an aftermarket relay harness several years ago and started running into problems then. Intermittent low beams. High beams that won't turn off. Funky fog light behavior.
I fixed the low beam problems with a new harness. Turns out the old harness had a poor connection going to the low beams. Other problems still existed. Another oddity I came across was that the high beam terminal in the original harness would show about 5V when the low beams were on.
Did some googling and found this link. It relates to the same problems with a Cherokee. The Cherokee apparently used two relays for controlling the fog lights, whereas the Eagle has only one, located on the passenger side inner fender. I copied the most relevant post below if you don't want to go to the link.
The solution they recommended did the trick, everything works as it should. Basically run a wire from the high beam feed to the white wire that goes to the fog light relay.
Maybe someone knows what the mystery 5V is?
https://www.cherokeeforum.com/f2/headlight-highbeam-constant-power-193028/
Suppose to be the fix:
If you have stock fog lights on a 97+ and upgrade your harness in a manner that uses the factory wiring to trigger some new relays, your fog lights will have and/or cause issues unless you make some additional modifications to address the problem. It doesn't matter if you use a plug and play harness like the eautoworks or if you split your harness open and completely strip out all the extra factory wiring like I did. The factory fog circuit will cause your new lighting system to not work properly.
If you do nothing, your headlights will work as mentioned above. Low beams will be fine, but after you turn on your high beams, they will not turn off again until you completely turn off your headlights. Big issue here is that when you switch back to low beams, both the high beam and low beam filament will be remain powered causing your bulbs to endure 115W worth of heat output instead of the 55W or 60W that they are designed for. From what I've read this can cause them to overheat and burn out within minutes.
So what is happening? If you look at the driver's side headlight plug (and you have factory fogs) you will notice there are two red wires coming out of one of the terminals. One is a small 18g Red wire which sadly is the stock high beam wire. The other is an even smaller 20g Red wire which ties into Fog Lamp Relay #1 in the PDC. Please keep in mind that Fog Lamp Relay #1 is NOT used to provide battery power to the fog lights the way we commonly use them with aftermarket lighting. It is located before the switch and simply cuts power to the Fog Light Switch unless the Headlight Switch and Beam Selector Switch are in the proper positions. It does this as law dictates that you can't run your high beams and fogs at the same time. Though not a problem here in CA, I've read that states with safety inspection programs will fail your vehicle if the lights don't operate this way.
I dug into the wiring diagrams but had to have kastein help me decipher them because there was something about this circuit that just wasn't making much sense to me. I still don't understand the function of Fog Lamp Relay #1 in its entirety, but we're only concerned with the part that is affected by the headlight harness anyways. Essentially, when your Headlight Switch is off, the relay coil receives no power and therefore won't allow your fog lights to come on. When your Headlight Switch is turned on, one side of the relay's coil receives 12V which causes the relay to activate and send power through to your Fog Light Switch. When you turn your high beams on, 12V is sent out to your headlight socket via the Beam Selector Switch, and then is sent back to the other side of the relay coil via the skinny Red wire on that shared terminal. This brings both sides of the relay coil to 12V, thus causing it to deactivate and turn off the Fog Light Switch. Weird huh? The factory designed it so that the relay is off with both sides at 0V, on with one side at 12V, and then off again with both sides at 12V. While it makes perfect sense now, this is the part that was confusing me.
So what's the problem then? Well, it turns out that even when the high beams are off, there is still approximately 5V on that skinny Red trigger wire for some reason which I still don't understand. While this is obviously not a problem in the factory configuration, it becomes a problem when you are using the high beam wire (which is directly tied into the skinny Red wire) to trigger your aftermarket high beam relay. A typical automotive relay requires approximately 8V to activate and needs to drop to somewhere below 1-5V to deactivate. When you first turn on your lights there is no problem because the phantom 5V is not enough to activate your new high beam relay. When you turn your high beams on, your new relay gets 12V and kicks on. When you go to turn off your high beams, the phantom 5V keeps the new relay from deactivating and voilà, your high beams are stuck on...
So how do we fix this? There are a few common suggestions that are out there that I just wasn't happy with, and a few that sort of work, but not as required by law:
1. Don't use your high beams, new lights are bright enough anyways (OK...)
2. If you have to use your high beams, turn your headlights off briefly to get them turn off (PITA)
3. Pull various fuses (lose your fog lights)
4. Pull the fog lamp relay (again, lose your fog lights)
5. Modify the fog lamp relay (fog lights work, but won't cut out when your high beams are on?)
6. Install a jumper in place of the fog light relay (fog lights work, but switch is always hot?)
One post I saw got it right though. lilredxj99 mentioned it in another thread which I didn't find until after the fact. The details were a little fuzzy and I still thought the issue deserved some further explanation so that's why I just wrote this
 novel...
Oh yeah, so the right way to do it... Cut the 20g Red Fog Lamp Relay #1 ground/trigger wire at the back of the driver's side headlight plug. Extend this wire using your preferred method so that it is long enough to reach your new aftermarket high beam relay. Splice it into the 87 pin (output) of your new high beam relay. If you have two 87's (which is ideal), either one is OK. Do not however use 87a if your relay has it!
Yep, that's it... Your high beams will now turn off when they're supposed to, your fog lights will turn on/off when they're supposed to, and your low beams will continue to work as they're supposed to. Sure you could have skipped all the way down to the bottom and found your answer, but you wanted to know how/why it works, right?