News: Putting FUN and FRIENDLINESS, FIRST into owning and learning about AMC small bodied cars, primarily Eagles, Spirits and Concords as well as vehicles built in AMC's Mexican subsidiary, VAM.

The AMC Eaglepedia can now be accessed using the buttons found below  This is a comprehensive ever growing archive of information, tips, diagrams, manuals, etc. for the AMC Eagle and other small bodied AMC cars. 

Also a button is now available for our Face Book Group page.


Welcome to the AMC Eagles Nest.  A new site under "old" management -- so welcome to your new home for everything related to AMC Eagles, Spirits and Concords along with opportunities to interact with other AMC'ers.  This site will soon be evolving to look different than it has and we will be incorporating new features we hope you will find useful, entertaining and expand your AMC horizons.

You can now promote your topics at your favorite social media site by clicking on the appropriate icon (top upper right of the page) while viewing the topic you wish to promote.


  • May 11, 2024, 09:43:56 AM

Login with username, password and session length

Author Topic: Priya's SX/4 project  (Read 339012 times)

0 Members and 2 Guests are viewing this topic.

Offline timsamc

  • Timsamc
  • Eagle DL
  • ***
  • Posts: 157
  • Thumbs Up 12
Re: Priya's SX/4 project
« Reply #60 on: January 27, 2009, 08:17:43 PM »
Hi there Priya!
   I just found this thread.  WOW!  You and your sweety (sorry, wasn't sure if he is your boyfriend, or Husband, etc), are just amazing with your talents.   Your descriptions and photos are so clear and the before and afters are just incredible!   I've just been reading and looking at these pictures and I'm just transfixed!  I would be SO intimidated to try and tackle that myself.   I would just love to be there while you were both doing the work and just watching and learning!  It's just amazing!   Thank you so much for sharing and I hope that we can see some updates soon of your most recent progress!  You seem to think that you are slow, but I've been amazed at the progress!   Best of luck to you both and hope we hear from you again soon!
-Tim
A mind is like a parachute.  It works best if it's open!

Offline priya

  • Premium Member
  • Eagle Turbo Diesel
  • *****
  • Posts: 1309
  • Thumbs Up 133
Re: Priya's SX/4 project
« Reply #61 on: January 30, 2009, 11:55:33 AM »
Hi guys, thanks for the appreciation.  I had major surgery in October so that was what interrupted me initially.  I've since recuperated but I'm really a wimp when it comes to getting outside in an ice-cold garage and waiting for it to heat up.  Earlier in the year I was whining about the coming of winter and my reluctance to go outside and my boyfriend was kinda stern and he was like "you need to get at it".  Since then he seems to have relented and when I suggested I might go out to work on a couple of the days where it got up to the freezing point he said leave it until April when its consistently around the freezing point and you can work on it steady - we were both wondering about the wisdom of cutting away the remainder of the inner rocker on the drivers side, it getting cold, and then me having to leave the car for several weeks while the body sags from lack of support structures.  We also figured it would get to be too expensive to heat the garage up daily when its -20 out and it takes an hour or two to get the garage up to 50 degrees or so.

So, look for more updates in April.  Till then I'm huddling inside and cheering for global warming.

Tim, I was intimidated by the job when I started to cut away all the soft metal and see what was ahead of me.  I was going to do my previous typle of repairs and just put small patches over the rusty metal and lap weld them into place but my boyfriend was like "that's crap and no body shop would do that, and it won't pass inspection..." and so on.  Before each repair he and I discussed the approach in detail until I became semi-comfortable with the plan and semi-confident that I could do it and then as I was doing the repair I consulted with him again in the middle to clarify and ask about problems or questions that came up.  I'd have to wait until he'd come home from work so sometimes this interrupted my work for the afternoon.  Anyway, now I'm a lot more confident that I can do serious rust repairs than I was.
« Last Edit: January 30, 2009, 12:01:48 PM by priya »

Offline landphil

  • Eagle Sport
  • ****
  • Posts: 489
  • Thumbs Up 10
Re: Priya's SX/4 project
« Reply #62 on: January 30, 2009, 08:49:25 PM »
Can't wait for spring this has to be one of my top 5 treads.  keep warm glad to hear you are doing ok after surgery.

Offline priya

  • Premium Member
  • Eagle Turbo Diesel
  • *****
  • Posts: 1309
  • Thumbs Up 133
Re: Priya's SX/4 project
« Reply #63 on: January 31, 2009, 12:26:34 PM »
Thanks landphil.

Offline IowaEagle

  • AMC Eagle Archivist
  • Administrator
  • AMC Eagles Den Addicted
  • ******
  • Posts: 31968
  • Thumbs Up 476
Re: Priya's SX/4 project
« Reply #64 on: January 31, 2009, 12:29:29 PM »
Glad to hear you are recovering.  The Eagle can wait until you feel you are ready, they are very understanding and patient cars.
Click for Toledo, IA Forecast" border="0" height="100" width="150   


Not a Jeep.  Not a Car.  Its an AMC Eagle!

1982 Eagle SX/4 Sport;
1980 Concord DL;
1970 Ambassador 2 Dr HT, SST
2002 Hyundai Santa Fe;
2008 Jeep Patriot Sport - Freedom Drive II

Offline priya

  • Premium Member
  • Eagle Turbo Diesel
  • *****
  • Posts: 1309
  • Thumbs Up 133
Re: Priya's SX/4 project
« Reply #65 on: January 31, 2009, 12:32:00 PM »
Best wishes to you too Iowa Eagle.

Offline priya

  • Premium Member
  • Eagle Turbo Diesel
  • *****
  • Posts: 1309
  • Thumbs Up 133
Re: Priya's SX/4 project
« Reply #66 on: April 21, 2009, 09:26:45 PM »
Well, I'm finally back at it.  I got back started on the SX/4 the second week of this month.  I bought a replacement driver's door last fall because I decided it would be a lot easier than fixing all the rust on mine.  I stripped the guts out of the old door and although the replacement isn't rusty it does have some minor damage so I repaired some of that.  On the inside of the door where the tag is there's a bolt near the bottom that holds the runner for the window.  On my replacement door that hole was broken out somehow so I had to weld in a patch to replace it.  There's also a dent in the upper window frame I'll get to later and a bit of a bend in the inner edge just above the door latch.

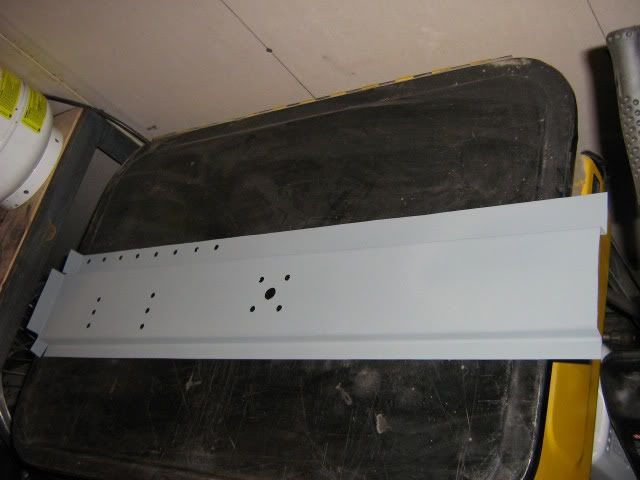
I got back to working on the driver's side and formed the rear half of the inner rocker:


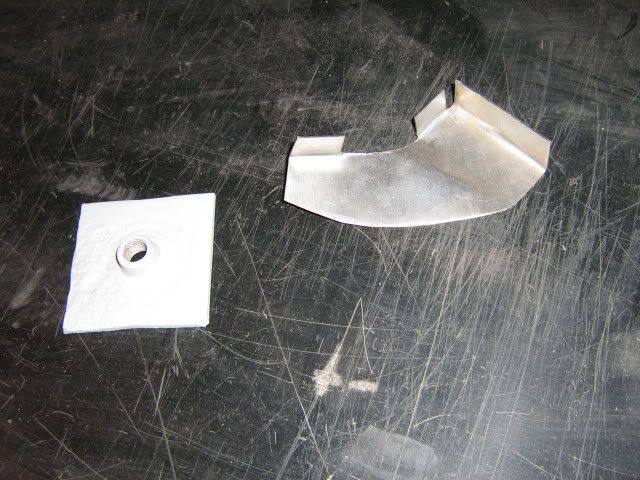
I also formed a small piece for the floorboards where the wheel well meets the inner rocker and removed the reinforcement for the rear seatbelt bolt from the old rusty inner rocker:


Here's the car after the rusty part of the wheel well, a small rusty area of the floorboards and the rear half of the inner rocker was removed and prepped for welding:


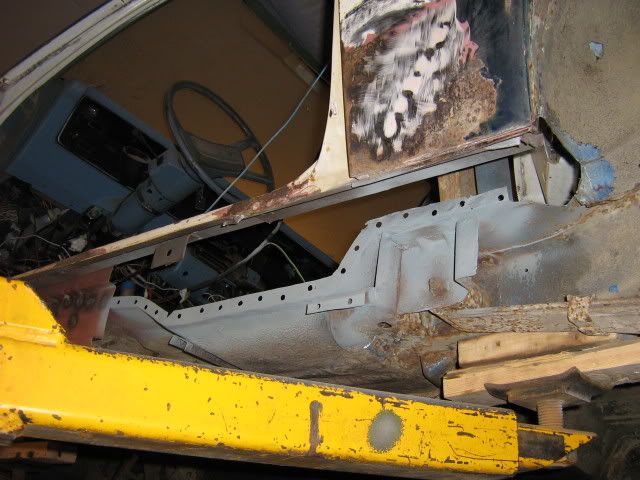
And here's the new rear half of the inner rocker welded in:

The original inner rocker was pretty banged up so it turns out I didn't get perfect measurements from it.  The completed new inner rocker is about 1/'4" lower in the middle where the front and rear halves meet than where the front and rear ends are so when I go to put the outer rockers on its going to take some tweaking to make it fit and look okay.  At least this isn't an area where fit is critical like the door frame.

The next part I have to tackle is the lower door frame and the rusty/dented part of the rear quarter panel between the wheel well and door - you can see that area in the picture above between the door opening and the rear end of the inner rocker panel.  I'm pretty nervous about that as I'll be cutting away key reference points for where the lower door frame goes and the top flange for the outer rocker so I have to get it very close or the door may not close right or at all or there will be big/mismatched gaps between the door and rear quarter or outer rocker - I can't be 1/4" out on that part.


Offline Eagleearl

  • Eagle Sport
  • ****
  • Posts: 379
  • Thumbs Up 20
Re: Priya's SX/4 project
« Reply #67 on: April 22, 2009, 12:21:55 AM »
Good work! Glad to see you making progress.

Offline IowaEagle

  • AMC Eagle Archivist
  • Administrator
  • AMC Eagles Den Addicted
  • ******
  • Posts: 31968
  • Thumbs Up 476
Re: Priya's SX/4 project
« Reply #68 on: April 22, 2009, 06:46:07 AM »
From what I can see there is some good work going on here.
Click for Toledo, IA Forecast" border="0" height="100" width="150   


Not a Jeep.  Not a Car.  Its an AMC Eagle!

1982 Eagle SX/4 Sport;
1980 Concord DL;
1970 Ambassador 2 Dr HT, SST
2002 Hyundai Santa Fe;
2008 Jeep Patriot Sport - Freedom Drive II

68AMXGOPAC

  • Guest
Re: Priya's SX/4 project
« Reply #69 on: April 22, 2009, 08:48:29 AM »
NIce work, glad to hear your back at it and feeling well.What gauge of metal are you using for the rocker pieces? I admire your fabrication skills, I am an sheet metal worker by trade ( or was) and loved doing layout and fabrication.

Offline priya

  • Premium Member
  • Eagle Turbo Diesel
  • *****
  • Posts: 1309
  • Thumbs Up 133
Re: Priya's SX/4 project
« Reply #70 on: April 22, 2009, 12:49:15 PM »
68AMXGOPAC the only gauge of sheet metal I can get is 22 so that's what I'm using for all the fabrication.  Its a little thinner than the original but I figure compared to the original rusty stuff its a great deal stronger.  I had a fair bit of practice at fabrication.  I originally started on a 280ZX that needed rocker panels, floorboards, rear quarters and parts in the wheel wells.  I fabricated all my replacement pieces with hand tools as I didn't have a sheet metal brake at that time.  It was all trial and error, I did a number of pieces 2 or 3 times before I got the proper shape - a lot of hours of pounding, bending, tweaking and wrestling went into that car.  Of course sometimes I still have to scrap my first attempt at making a replacement piece, that's part of the game, but a lot less often than I did at first.

Thanks for all the encouragement guys!

Offline priya

  • Premium Member
  • Eagle Turbo Diesel
  • *****
  • Posts: 1309
  • Thumbs Up 133
Re: Priya's SX/4 project
« Reply #71 on: May 11, 2009, 08:35:48 PM »
The next section to be replaced is the lower door frame.  A section of this had actually been replaced before at some point (apparently from collision damage) but it rusted through in three places where the replacement lower door frame was welded together.


I cut out an area  a couple of inches on either side  of where the replacement door frame was put in to get back to the original sheet metal:


Here's the replacement piece I salvaged from one of Teamamc's cars  My husband wanted me to fabricate a new piece but although it is all straight lines the angles vary from one end to the other of the piece and I thought that'd be pretty hard to replicate especially given that the piece I cut out didn't have exactly the correct angles to begin with and that was all I had to go on.


And here's the "new" lower door frame welded in.  There's going to be a few hours of grinding to get these welds flush.

Offline IowaEagle

  • AMC Eagle Archivist
  • Administrator
  • AMC Eagles Den Addicted
  • ******
  • Posts: 31968
  • Thumbs Up 476
Re: Priya's SX/4 project
« Reply #72 on: May 11, 2009, 08:41:13 PM »
That looks mighty nice.   Did you trace it before installation so when the day comes fabrication of such pieces needs to be done?
Click for Toledo, IA Forecast" border="0" height="100" width="150   


Not a Jeep.  Not a Car.  Its an AMC Eagle!

1982 Eagle SX/4 Sport;
1980 Concord DL;
1970 Ambassador 2 Dr HT, SST
2002 Hyundai Santa Fe;
2008 Jeep Patriot Sport - Freedom Drive II

Offline priya

  • Premium Member
  • Eagle Turbo Diesel
  • *****
  • Posts: 1309
  • Thumbs Up 133
Re: Priya's SX/4 project
« Reply #73 on: May 11, 2009, 09:10:36 PM »
No, I figure the next time this rusts out it'll be a bigger area than the last time and that door frame piece goes into the rear quarter where a number of panels come together and I figure at that point it'll be beyond my ability to repair.   Your point is well taken though - I threw away the patterns I made for panels on the passenger side once I'd cut the sheet metal and then when I was doing the driver's side I was like "You idiot, if you'd have saved those patterns you wouldn't have to spend all this time redoing them for the same panels on the driver's side".  C'est la vie.

Offline priya

  • Premium Member
  • Eagle Turbo Diesel
  • *****
  • Posts: 1309
  • Thumbs Up 133
Re: Priya's SX/4 project
« Reply #74 on: May 28, 2009, 07:54:46 PM »
The next piece to get repaired was the corner of the door frame.  Here it is after the rusty area was removed and the remainder prepped for welding:


Here's the replacement piece.  This was salvaged from the same car as the lower door frame and the two were originally attached by fifteen spot welds.  It was a lot of fun seperating the two pieces but I managed to do it without destroying a piece I probably wouldn't have been able to form by hand.


And here it is welded in, I was nervous about it, but the welding went fairly smoothly.


SMF spam blocked by CleanTalk